A tenant moves out, and there’s a long scratch across the hallway floor. Was it there on day one? Without a dated record, nobody can say for sure, and that’s how a simple move-out turns into a deposit dispute.
A rental inspection checklist is a room-by-room record of a rental unit’s condition, filled in at move-in, during the tenancy and at move-out. Paired with dated photos, it shows exactly what changed while the tenant lived there, which is what both sides need when deposit deductions come up.
Below you’ll find a complete checklist you can use for every visit, a free printable version, and the notice and deposit rules to know before you inspect. Landlord-tenant law varies by state, so we point out where your rules might differ.
Last updated: November 16, 2026. Legal points are general information, not legal advice. Check your state’s landlord-tenant law before you inspect.
Key Takeaways
If you only remember four things, make it these.
- Use the same checklist at move-in, routine, pre-move-out and move-out visits so every record lines up.
- Most states require 24 hours’ to two days’ notice before a non-emergency entry.
- Deposit deadlines range from 14 to 60 days after move-out, depending on the state.
- Download the free printable checklist (PDF) and rate each item Good, Fair or Damaged.
Rental Inspections at a Glance
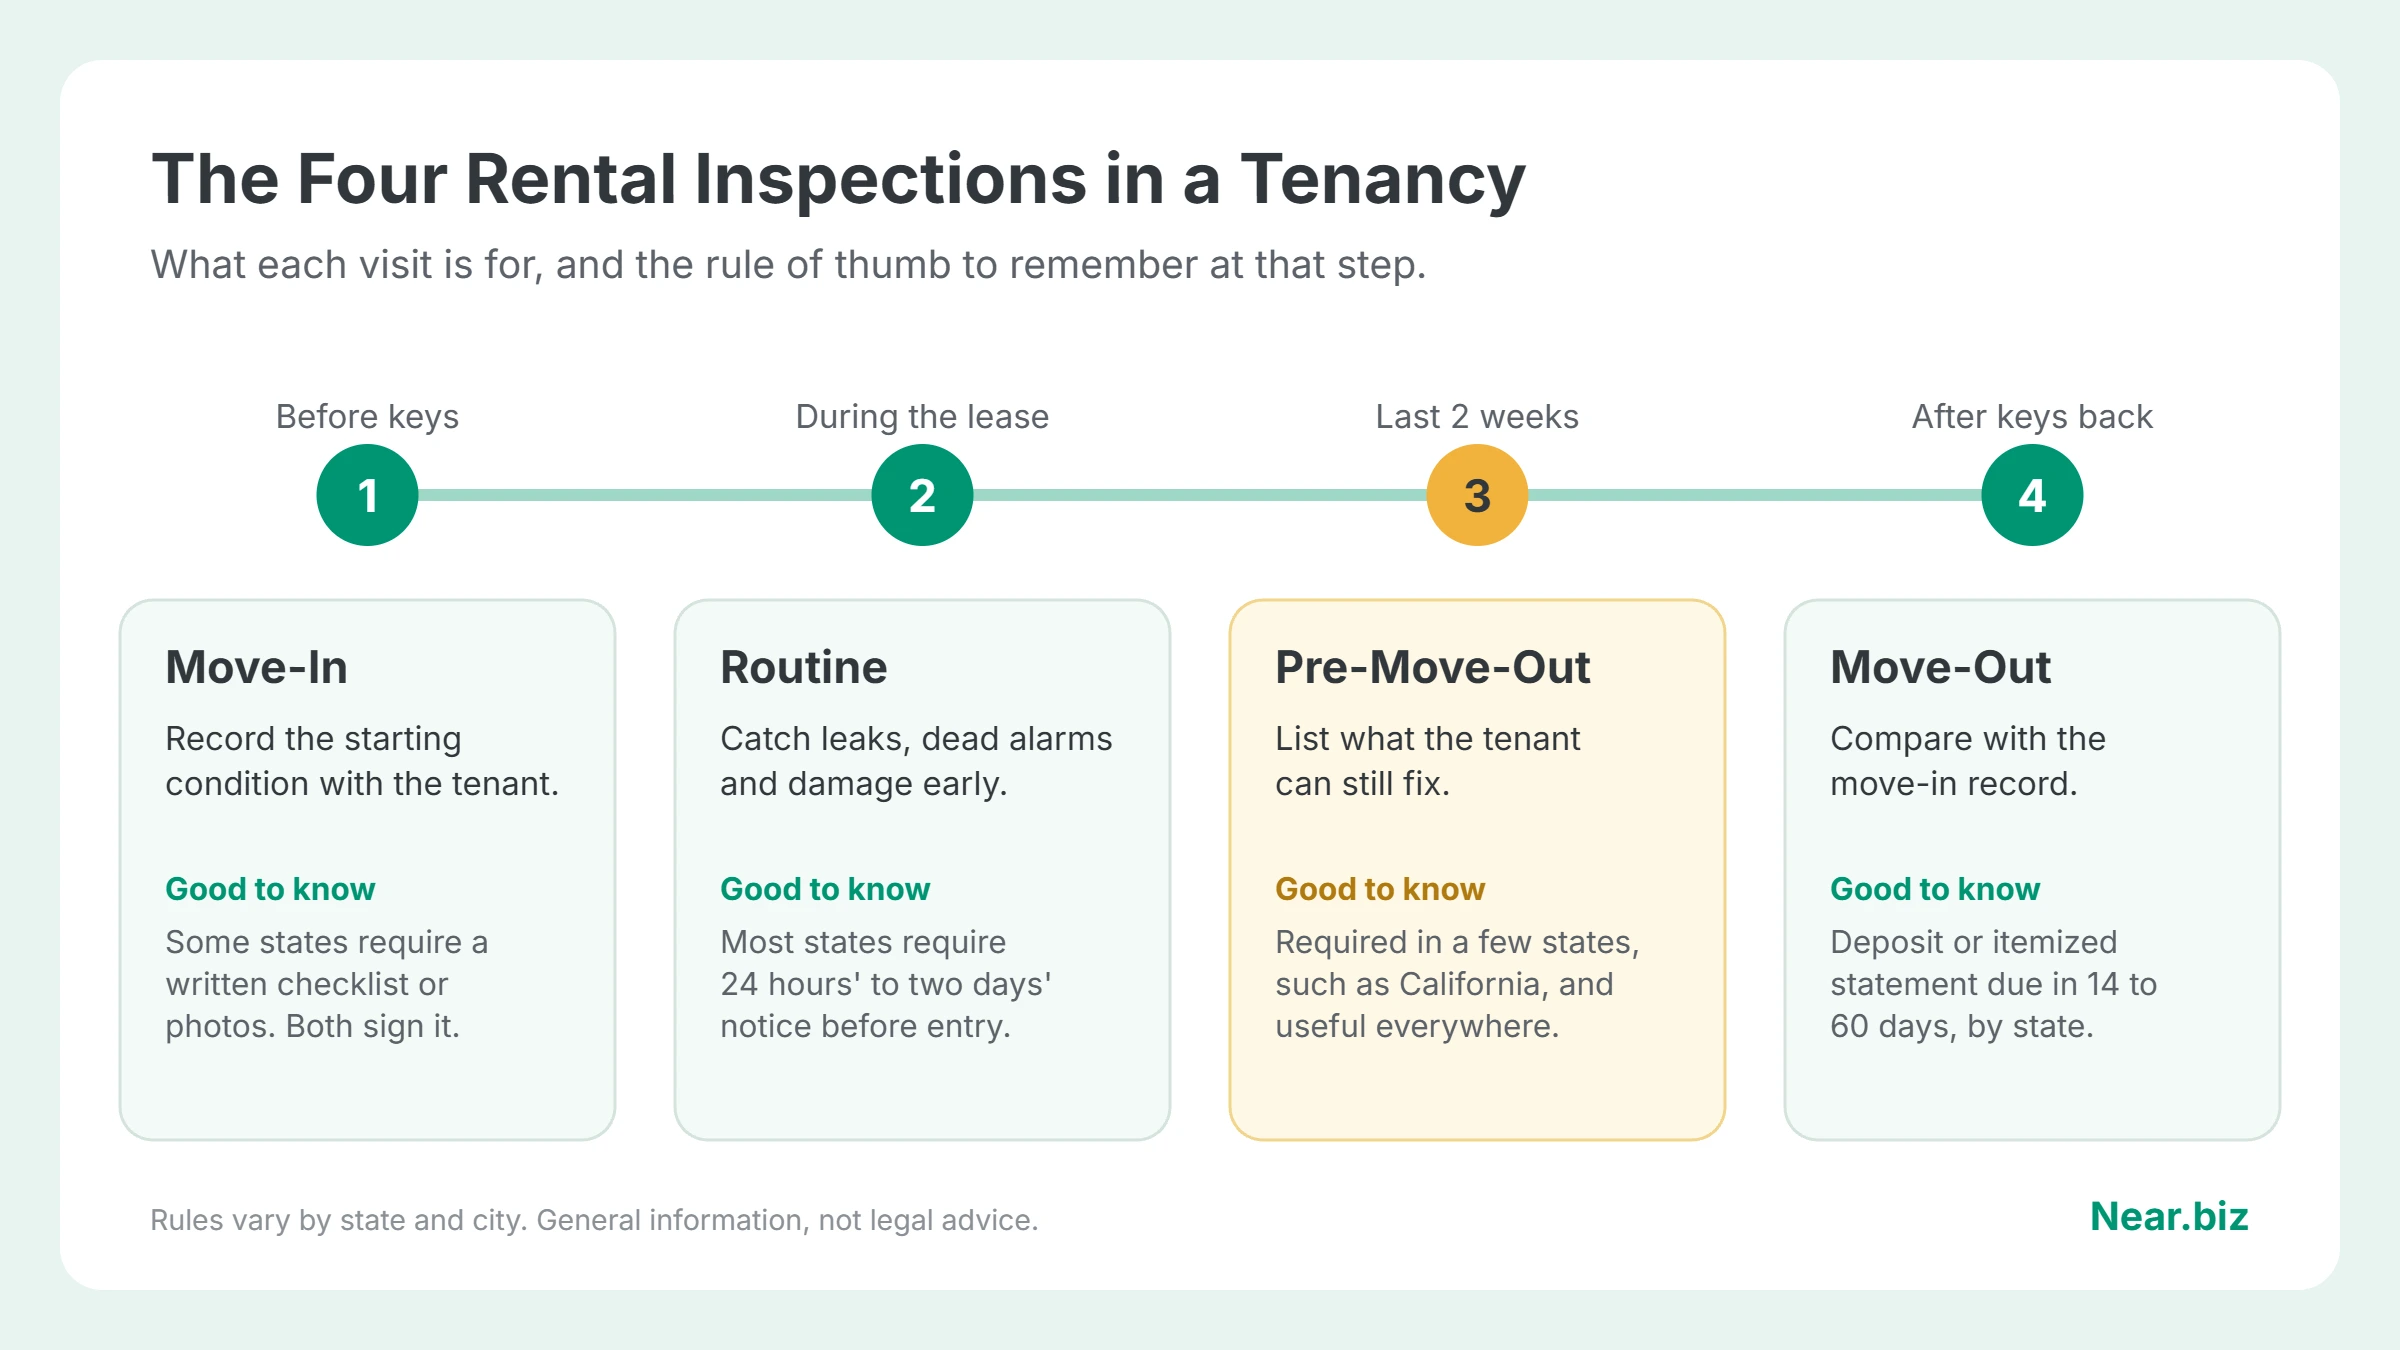
Most tenancies involve up to four inspections. Each has a different job, and each comes with a rule of thumb worth knowing:
| Inspection | When | Purpose | Rule of Thumb |
|---|---|---|---|
| Move-in | Before the tenant gets the keys | Record the starting condition | Walk through together, sign the checklist and keep dated photos |
| Routine | During the tenancy, often every 6 to 12 months | Catch leaks, safety issues and damage early | Give written notice; most states require 24 hours to two days |
| Pre-move-out | A week or two before the tenancy ends | Show the tenant what to fix before leaving | Required on request in some states, such as California |
| Move-out | After the tenant returns the keys | Compare with move-in and decide deductions | Photograph before any cleaning or repairs, and meet your state’s deposit deadline |
What to Bring to a Rental Inspection
A good inspection takes less time when you have the right things in hand. Pack these before you go:
- The signed move-in checklist and photos, so you can compare item by item.
- A phone that saves the date with each photo.
- A flashlight for under sinks, inside cabinets and the water heater area.
- An outlet tester and a step stool for testing smoke and carbon monoxide alarms.
- This checklist, printed or on a tablet, with space for notes and photo numbers.
Room-by-Room Rental Inspection Checklist
Rate each item Good, Fair or Damaged, add a short note and record the photo number. Be specific: “2-inch scratch on bedroom door, left side” holds up far better later than “some wear.”
Entry, Living Room and Hallways
Start at the front door and work your way around the room.
- Front door, lock, deadbolt and peephole work
- Walls and ceilings: marks, holes, cracks, water stains
- Floors and carpet: stains, burns, tears, loose boards
- Windows open, close and lock; screens intact
- Blinds or window coverings present and working
- Light switches, outlets and fixtures work
Kitchen
Open every appliance, cabinet and drawer, and run the water.
- Stove and oven: all burners heat, oven clean, knobs present
- Refrigerator: cools, seals intact, shelves and drawers present
- Dishwasher and garbage disposal run without leaks
- Sink and faucet: no drips, good pressure, dry underneath
- Cabinets and drawers: doors aligned, hinges and handles intact
- Countertops: chips, burns, stains
- Range hood fan and light work
Bathrooms
Look past the surfaces here, because water damage often hides under sinks and around the tub.
- Toilet flushes, refills and does not rock or leak at the base
- Shower and tub: caulking, grout, drain speed, signs of mold
- Sink, faucet and vanity: leaks underneath, water damage
- Exhaust fan works
- Mirrors, towel bars and toilet paper holder secure
- Floor firm around the toilet and tub, with no soft spots
Bedrooms
Bedrooms are quick, but don’t skip the closets and windows.
- Walls, ceilings and floors, as for living areas
- Closet doors slide or swing properly
- Windows open and lock; nothing blocks them
- Smoke alarm present and working where required
Laundry, Utilities and Systems
Note filter dates and any warning signs so you can track these systems from one visit to the next.
- Washer and dryer (if provided) run; dryer vent clear
- Water heater: no leaks or rust, strapped where local code requires
- Heating and air conditioning turn on; filter date noted
- Electrical panel accessible and labeled
- Water shut-off valve accessible
Safety Items
Test these rather than just looking at them. Press the test button on every alarm.
- Smoke alarms tested in each required location
- Carbon monoxide alarms tested where the home has gas appliances or an attached garage
- Fire extinguisher (if provided) charged and in date
- Stair railings secure
- All exterior doors and windows lock
Outside the Unit
Walk the outside of the property too, even on a quick routine visit.
- Roof and gutters seen from the ground: missing shingles, clogged gutters
- Exterior walls, paint and trim
- Yard, fences and gates
- Garage door opens and closes safely
- Patio, balcony and decking: loose boards or railings
- Signs of pests or standing water near the foundation
For the upkeep tasks that go with these checks each season, see the rental property maintenance checklist by season. If a check turns up a dead alarm, a smoke detector and safety visit can be booked for the same address.
Move-In Inspection: Set the Baseline
The move-in inspection is the reference point for every visit that follows, so it’s worth doing slowly and, ideally, with the tenant there. Work through it in this order:
- Walk every room with the checklist before handing over the keys.
- Photograph each room from the doorway, then take close-ups of any existing damage.
- Describe appliances, flooring and walls in plain words.
- Ask the tenant to review and sign the checklist, and give them a copy.
- Store the signed checklist and photos together where you can find them a year or more later.
Some states require a written move-in record or photos before a landlord can make deductions. California, for example, now requires photos at the start of any tenancy that began on or after July 1, 2025. Check your state’s rules before the first walkthrough.
Routine Inspections During the Tenancy
Routine inspections catch slow leaks, failed alarms, pests and damage before they become expensive. Many landlords add one mid-lease visit every 6 to 12 months, as Apartments.com notes, on top of the move-in and move-out inspections.
Notice is where most landlords need to be careful. Nolo’s summary of state access laws shows most states require 24 hours’ to two days’ notice before a non-emergency entry, while a few only require “reasonable” notice and some have no statute at all, leaving it to the lease. Not every state lists routine inspections as a reason for entry, so agree on a time with the tenant, give written notice and pair the visit with a task, such as changing an air filter or testing alarms.
Sample Inspection Notice
A short written notice keeps things clear and friendly. Adapt this to your lease, your state’s notice period and how you usually contact the tenant:
“Hi [Tenant name], as agreed, we will visit [address] on [date] between [time] and [time] to test the smoke and carbon monoxide alarms, change the air filter and check for leaks under the sinks. The visit should take about 30 minutes, and you are welcome to be there. Please let us know if another time works better. [Your name, phone]”
Pre-Move-Out Inspection: A Chance to Fix Things First
A walkthrough a week or two before the lease ends lets the tenant fix problems before they turn into deductions. A few states require landlords to offer one. In California, for instance, tenants can ask for this inspection in the last two weeks of the tenancy, with 48 hours’ written notice, as the California Attorney General’s deposit guide explains. Even where it’s optional, it’s one of the easiest ways to avoid a dispute. To run one:
- Schedule it one to two weeks before move-out and give written notice.
- Walk the unit with the move-in checklist and photos.
- Give the tenant a written list of the cleaning or repairs you would otherwise deduct for.
- Let them know you’ll inspect again once they’ve returned the keys.
Move-Out Inspection: Compare and Document
The move-out inspection is where your earlier records pay off. Follow these steps so every deduction is easy to explain:
- Inspect as soon as possible after the tenant returns the keys.
- Walk the unit with the move-in checklist and photos side by side.
- Photograph every issue before any cleaning or repairs start.
- Separate ordinary wear and tear from damage (see the table below).
- Arrange the work, then photograph the result.
- Return the deposit, or send an itemized statement, within your state’s deadline. Deadlines range from 14 to 60 days, and Nolo keeps a state-by-state deadline chart.
The days between tenants are laid out in our tenant turnover checklist, and the move-out cleaning cost guide covers what cleaning costs and what you can charge for it.
Normal Wear and Tear vs Damage
Landlords generally can’t deduct for ordinary wear and tear, according to Nolo. These examples show where the line usually falls, though the final call depends on the item’s age and its condition at move-in:
| Usually Wear and Tear | Usually Damage |
|---|---|
| Light scuffs and small nail holes | Large holes, broken drywall, unapproved paint colors |
| Carpet worn along walking paths | Burns, large stains, pet damage, tears |
| Paint faded by sunlight | Crayon, marker or smoke staining |
| Loose door handle from normal use | Broken door or damaged frame |
| Minor grout discoloration | Cracked tiles, mold from unreported leaks |
Free Printable Rental Inspection Checklist
Download the printable rental inspection checklist (PDF). It has columns for move-in, routine and move-out ratings, room-by-room sections that match this guide, and space for notes, photo numbers and signatures.
Running Inspections When You Live Far Away
If you can’t get to the rental, ask a trusted person or a local professional to walk the unit with this checklist and send dated photos. When the inspection turns up work, such as a dripping faucet, a dead smoke alarm or a move-out clean, you can request it for the rental’s address through our rental property maintenance service for landlords. Our guide to handling maintenance requests from far away covers approving and tracking that work, and the remote landlord maintenance guide covers the bigger picture.
Frequently Asked Questions
What Should Be on a Rental Inspection Checklist?
A rental inspection checklist should cover every room and system: walls, floors, windows, doors, appliances, plumbing fixtures, heating and cooling, smoke and carbon monoxide alarms, and the outside of the property. For each item, record a condition rating, a short specific note and a photo number so later inspections can be compared.
How Often Can a Landlord Inspect a Rental Property?
Most states don’t set a number. Landlords usually inspect at move-in and move-out, and many add a routine visit every 6 to 12 months. Each visit needs a legitimate reason and proper notice under state law, so schedule it with the tenant and avoid inspecting so often that it disturbs their privacy.
How Much Notice Does a Landlord Need to Give Before an Inspection?
Most states require 24 hours’ to two days’ notice before a landlord enters for a non-emergency reason, such as an inspection. A few states only require “reasonable” notice, and some leave it to the lease. Written notice is the safest choice everywhere, and emergencies usually don’t need notice at all.
What Is a Pre-Move-Out Inspection?
A pre-move-out inspection is a walkthrough a week or two before a tenancy ends. The landlord points out cleaning or repairs they would otherwise deduct for, so the tenant can fix them before leaving. A few states require landlords to offer one when the tenant asks, and it’s a useful step everywhere.
Should the Tenant Sign the Inspection Checklist?
Yes, it’s good practice for both the landlord and tenant to sign the move-in checklist and keep a copy. A signed record of the starting condition, backed by dated photos, makes it much harder for either side to dispute what was already there when deductions come up at move-out.
Do Landlords Need to Take Move-In Photos?
It depends on the state, but photos are smart everywhere. Some states now require them; California, for example, requires move-in photos for tenancies starting on or after July 1, 2025. Even where they’re optional, dated photos are the clearest proof of a unit’s condition if a deposit deduction is challenged.
About the Author
Tehreem writes about home care and property maintenance for Near.biz, with practical guides for landlords, renters and homeowners.